Overview
Instaclustr provides a robust, managed platform for Apache Kafka, handling the complex operational overhead of running a distributed streaming ecosystem. While the platform ensures reliability and scalability, developers and operators still need a powerful tool for monitoring, managing, and interacting with their Kafka resources. This is where Kpow, the all-in-one toolkit for Kafka, shines.
In this guide, we will walk through the complete process of setting up Kpow to connect to and manage a Kafka environment hosted on Instaclustr. We will begin by provisioning a Kafka cluster with Karapace Schema registry and Kafka Connect cluster. Then, we will configure and launch a local Kpow instance, detailing how to gather the correct connection information from the Instaclustr console. To put this integration into practice, we will use Kpow's interface to deploy a full data pipeline, demonstrating how to manage custom connectors, inspect topic data, and view schemas in real-time. By the end of this tutorial, we will have a fully operational Kpow instance providing a comprehensive view and powerful control over our managed Instaclustr environment.
</> The source code and configuration files used in this tutorial can be found in the
integrations/instaclustr-getting-starteddirectory of the examples GitHub repository.
💡 Kpow can be integrated with a wide range of managed Kafka services. See the following guides for more details.
About Factor House
Factor House is a leader in real-time data tooling, empowering engineers with innovative solutions for Apache Kafka® and Apache Flink®.
Our flagship product, Kpow for Apache Kafka, is the market-leading enterprise solution for Kafka management and monitoring.
Explore our live multi-cluster demo environment or grab a free Community license and dive into streaming tech on your laptop with Factor House Local.
Preparing deployment of custom Kafka connectors
Deploying S3 buckets and create an IAM user
To begin, we'll provision the necessary AWS resources using a CloudFormation template. This template will create two S3 buckets and an IAM user with the appropriate permissions.
AWSTemplateFormatVersion: "2010-09-09"

Parameters:
  ResourceNamePrefixParameter:
    Type: String
    Default: fh-instaclustr
    AllowedPattern: "[a-z0-9\\-]+"
    Description: Custom connector AWS storage resources name prefix

Resources:
  InstaclustrKafkaConnectCustomConnectorsBucket:
    Type: AWS::S3::Bucket
    Properties:
      BucketName: !Sub "${ResourceNamePrefixParameter}-custom-connector"

  InstaclustrKafkaConnectSinkBucket:
    Type: AWS::S3::Bucket
    Properties:
      BucketName: !Sub "${ResourceNamePrefixParameter}-sink"

  InstaclustrCustomConnectorPullUser:
    Type: AWS::IAM::User
    Properties:
      UserName: !Sub "${ResourceNamePrefixParameter}-user"

  InstaclustrCustomConnectorUserAccessPolicy:
    Type: AWS::IAM::Policy
    Properties:
      PolicyName: !Sub "${ResourceNamePrefixParameter}-policy"
      PolicyDocument:
        Version: "2012-10-17"
        Statement:
          - Effect: Allow
            Action:
              - s3:ListBucket
              - s3:GetBucketLocation
            Resource:
              - !GetAtt InstaclustrKafkaConnectCustomConnectorsBucket.Arn
              - !GetAtt InstaclustrKafkaConnectSinkBucket.Arn

          - Effect: Allow
            Action:
              - s3:GetObject
            Resource: !Sub "${InstaclustrKafkaConnectCustomConnectorsBucket.Arn}/*"

          - Effect: Allow
            Action:
              - s3:PutObject
              - s3:GetObject
              - s3:AbortMultipartUpload
              - s3:DeleteObject
              - s3:ListMultipartUploadParts
            Resource: !Sub "${InstaclustrKafkaConnectSinkBucket.Arn}/*"
      Users:
        - !Ref InstaclustrCustomConnectorPullUser

Outputs:
  CustomConnectorS3BucketName:
    Value: !Ref InstaclustrKafkaConnectCustomConnectorsBucket
    Description: Name of S3 bucket to hold custom connector JARs

  SinkS3BucketName:
    Value: !Ref InstaclustrKafkaConnectSinkBucket
    Description: Name of S3 bucket for the S3 sink connector to write data to
The CloudFormation stack will create the following resources:
<prefix>-custom-connector: An S3 bucket designated for uploading our custom Kafka connector artifacts. The default name isfh-instaclustr-custom-connector.<prefix>-sink: A second S3 bucket that will serve as the destination for records from our Kafka topic. The default name isfh-instaclustr-sink.<prefix>-user: An IAM user with read access to the connector source bucket and read/write permissions for the sink S3 bucket. The default username isfh-instaclustr-user.
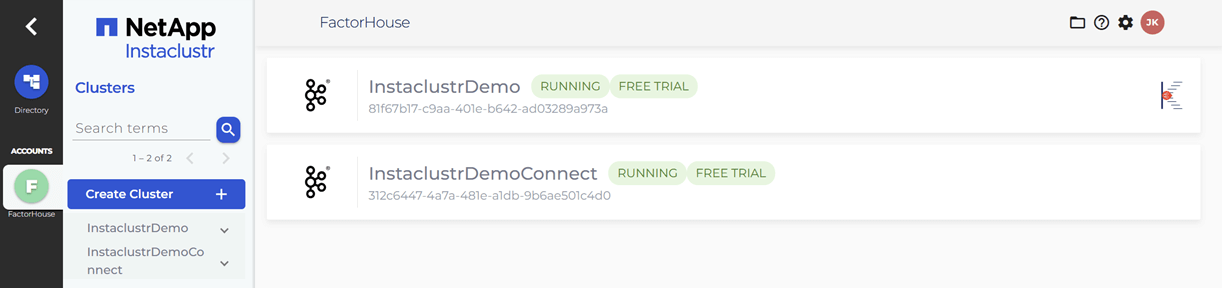
Create Kafka and Kafka Connect clusters
Within the Instaclustr console, we will create a Kafka cluster. For this demonstration, we will include the Karapace schema registry as an enterprise add-on. When creating the Kafka Connect cluster, we must ensure that we select the previously created Kafka cluster as the target. It is also crucial that we enable the Use custom connectors option. This will present a configuration form where we can provide the name of the S3 bucket containing our connector artifacts and the necessary AWS credentials. For more detailed instructions, please refer to the official Instaclustr documentation.
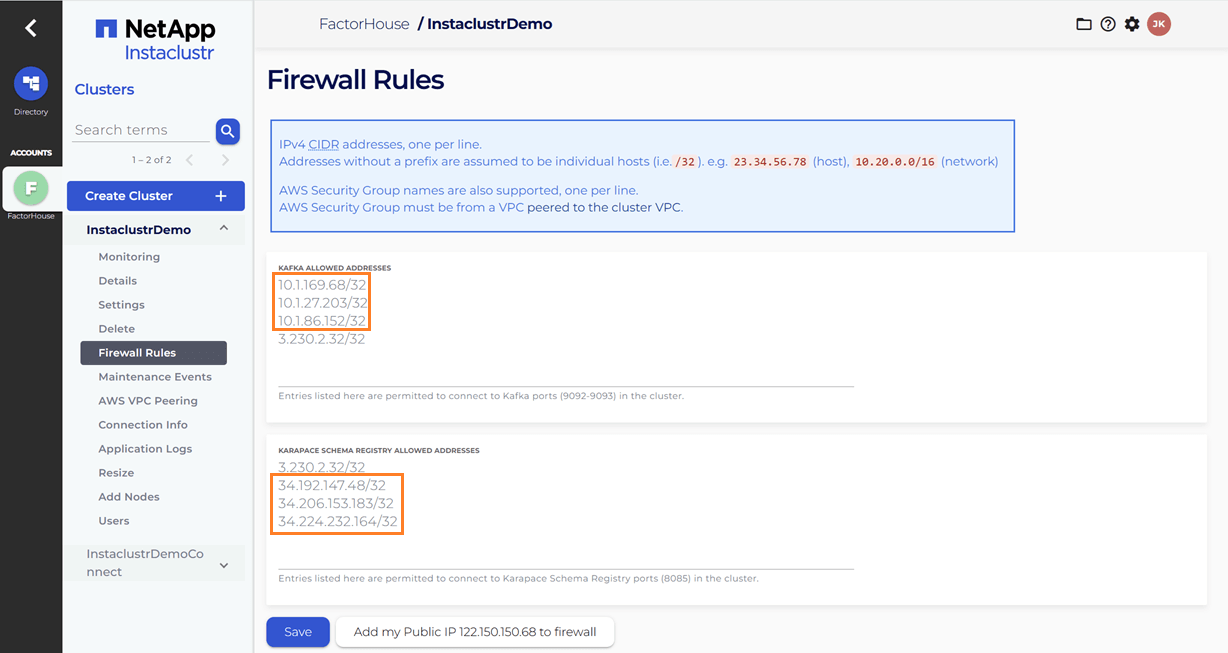
Update firewall rules
When we link the Kafka Connect cluster to the target Kafka cluster, the firewall rules for the Kafka cluster are automatically updated to include the IP addresses of the Kafka Connect cluster. However, the firewall rules for the Karapace schema registry are not automatically adjusted. We will need to manually add the public IP addresses of the Kafka Connect cluster to the Karapace schema registry's allowed addresses. It appears that the connection from the Kafka Connect cluster to the schema registry is established over public IPs.
Upload Kafka connect artifacts to S3
Next, we will upload two custom Kafka connectors to the newly created S3 bucket. A shell script is provided to streamline this process.
./integrations/instaclustr-getting-started/connector/upload-connectors.sh <bucket-name>

# ▶️  Downloading and syncing Kafka connector artifacts to s3://<bucket-name>/
# ⏳ Progress : [##################################################] 100%✅ Sync complete!
#
# ✅ Download complete in 0m 29s!
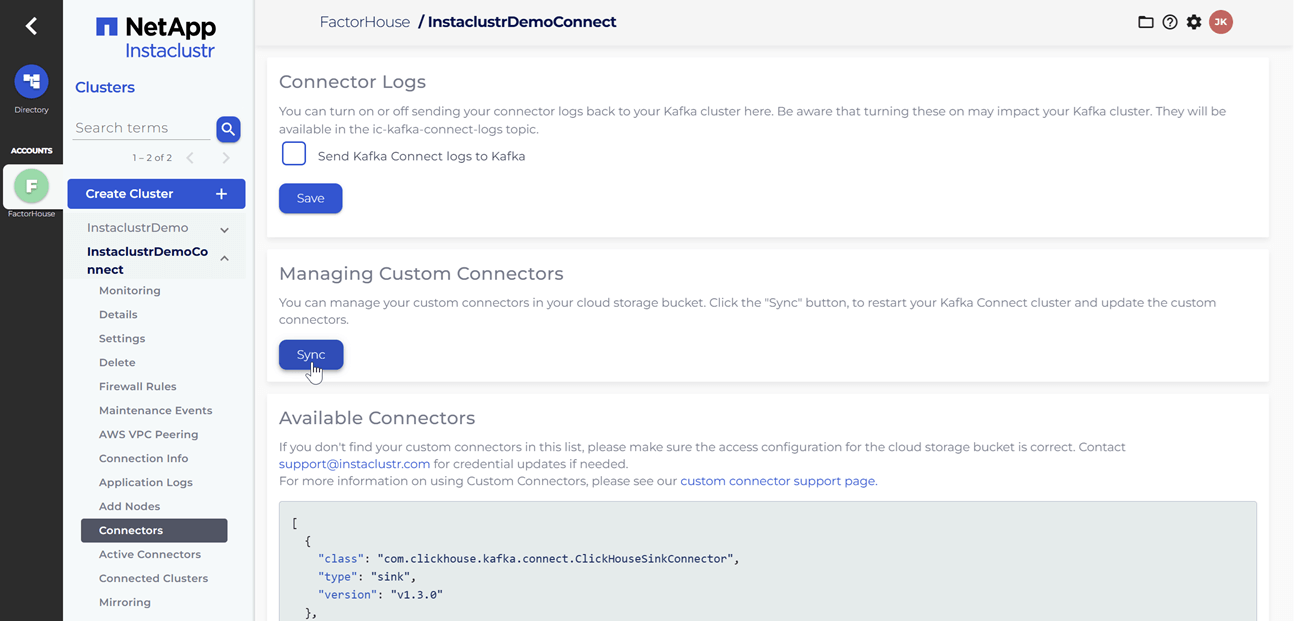
After the artifacts are uploaded to the S3 bucket, we will navigate to our Kafka Connect cluster in the Instaclustr console and click the Sync button. This action triggers the download of the connector artifacts to the Connect cluster.
Deploy Kpow instance
Once our Kafka and Kafka Connect clusters are running, we can initiate a Kpow instance using Docker. The configuration details required for Kpow to connect to our Instaclustr-managed Kafka environment are outlined below.
The setup.env file is crucial for establishing the connection between Kpow and our Kafka ecosystem on Instaclustr. Here's a detailed guide on how we can populate this file with the correct information sourced from the Instaclustr console:
- Kafka Cluster: The bootstrap server addresses, which are the public IP addresses of our Kafka brokers, can be found on the Connection Info page of our Kafka cluster. This page also provides the necessary username and password. These values should be assigned to the
BOOTSTRAPandSASL_JAAS_CONFIGvariables, respectively. - Schema Registry: For the Schema Registry connection, we will need the URL that is secured with a CA-signed certificate. This URL, along with the required username and password, is also available on the Connection Info page for our Schema Registry service.
- Kafka Connect Cluster: The configuration for our Kafka Connect cluster requires its public IP address for the
CONNECT_REST_URL. The credentials (username and password) for the Connect cluster can be found on its respective Connection Info page and should be used in the connection configuration.
💡 To enable a connection from our local machine to the Kafka resources, it is essential to add our IP address to the Firewall Rules within the Instaclustr console for our cluster.
## Kafka environments
ENVIRONMENT_NAME=Instaclustr Demo
BOOTSTRAP=<KAFKA-IP1>:9092,<KAFKA-IP2>:9092,<KAFKA-IP3>:9092
SECURITY_PROTOCOL=SASL_PLAINTEXT
SASL_MECHANISM=SCRAM-SHA-256
SASL_JAAS_CONFIG=org.apache.kafka.common.security.scram.ScramLoginModule required username="<KAFKA_USERNAME>" password="<KAFKA_PASSWORD>";
CONNECT_NAME=Instaclustr Demo Cluster
CONNECT_REST_URL=https://<KAFKA-CONNECT-IP1>:8083
CONNECT_PERMISSIVE_SSL=true
CONNECT_AUTH=BASIC
CONNECT_BASIC_AUTH_USER=<KAFKA_CONNECT_USERNAME>
CONNECT_BASIC_AUTH_PASS=<KAFKA_CONNECT_PASSWORD>
SCHEMA_REGISTRY_NAME=Instaclustr Demo Registry
SCHEMA_REGISTRY_URL=https://<REGISTRY_URL_WITH_AN_ASSOCIATED_CA_SIGNED_CERTIFICATE>:8085
SCHEMA_REGISTRY_AUTH=USER_INFO
SCHEMA_REGISTRY_USER=<SCHEMA_REGISTRY_USERNAME>
SCHEMA_REGISTRY_PASSWORD=<SCHEMA_REGISTRY_PASSWORD>
To launch Kpow, we execute the following Docker command. Ensure that a valid Kpow license file is located at ./kpow/config/license.env.
docker run -d -p 3000:3000 --name kpow \
  --env-file=./kpow/config/setup.env \
  --env-file=./kpow/config/license.env \
  factorhouse/kpow-ce:latest
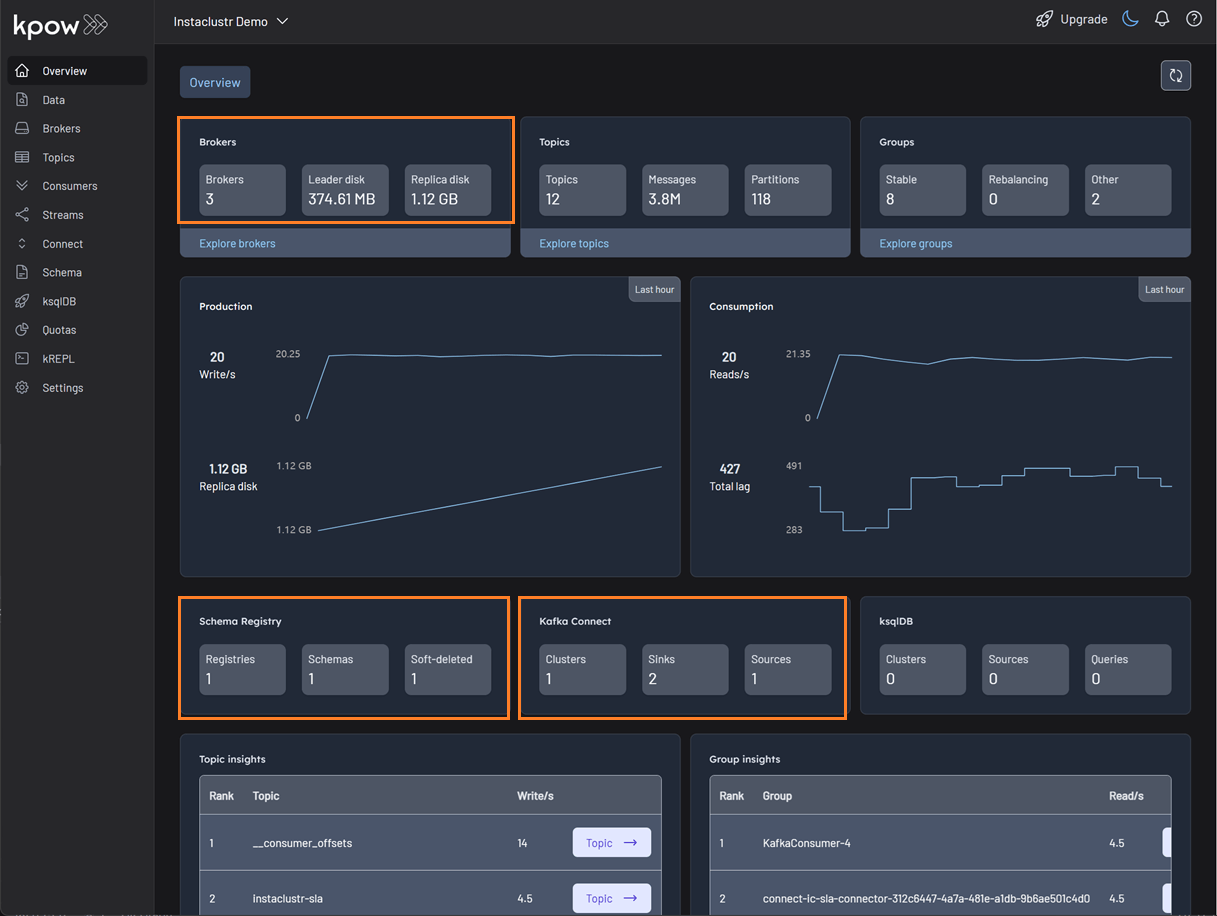
Once running, Kpow will be accessible at http://<ip-address>:3000. The user interface should confirm the successful discovery of our three Kafka brokers, the Schema Registry, and the Kafka Connect cluster.
Deploying Kafka connectors
We are now ready to deploy our connectors using Kpow's interface. We will start with the source connector to generate data and then deploy the sink connector to write that data to S3.
Deploying the source connector (MSK data generator)
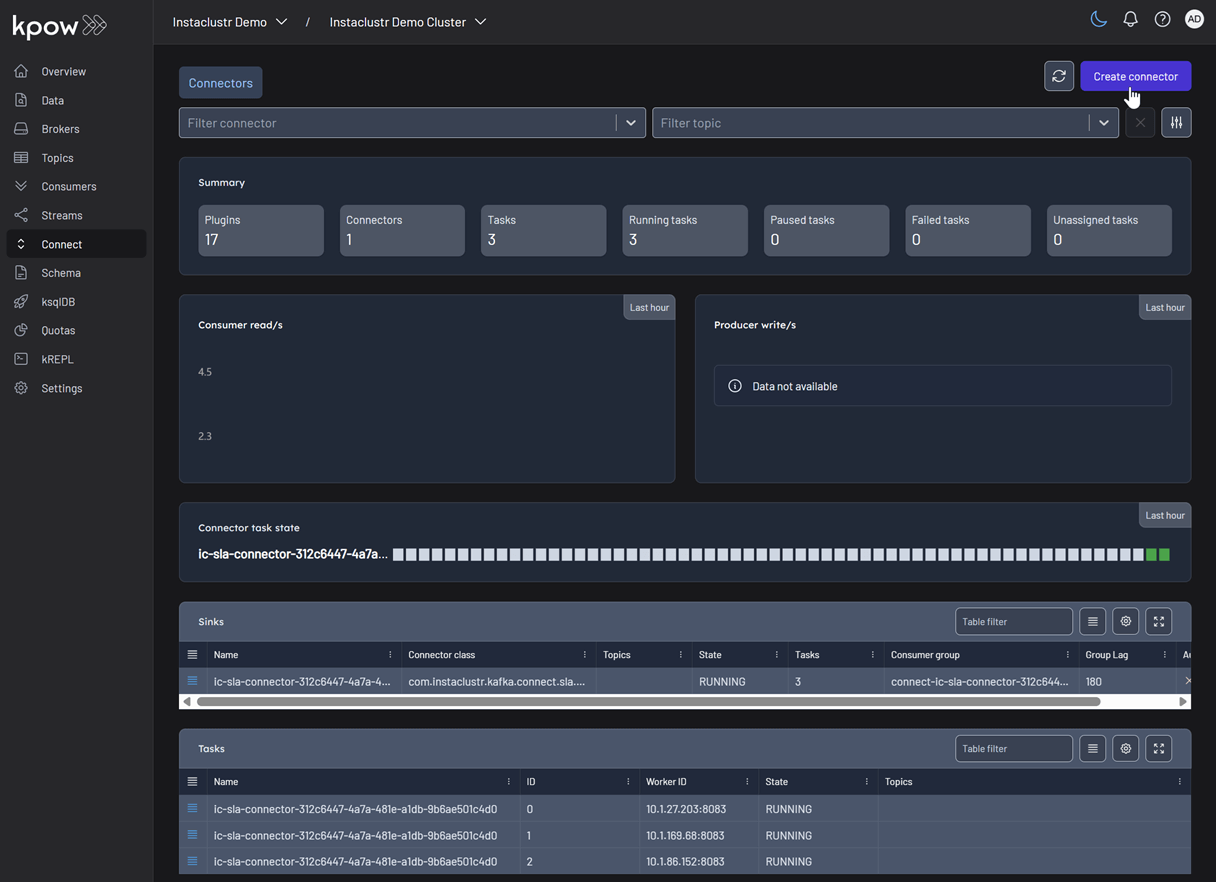
From the Connect menu in the Kpow UI, click the Create connector button.
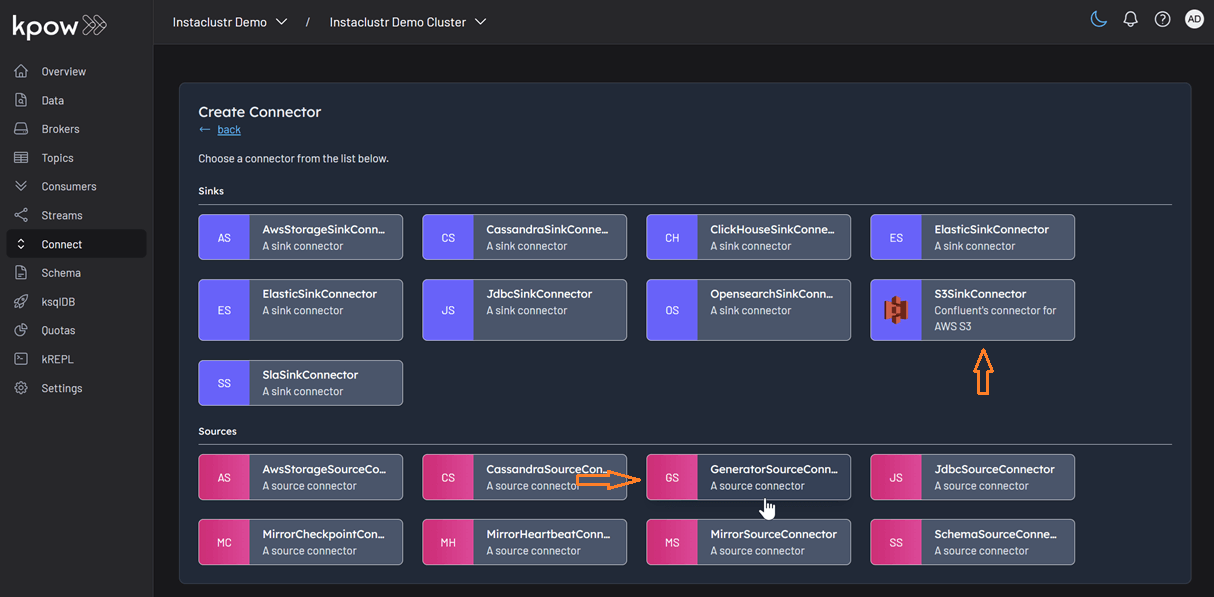
This will display a list of available connectors, which includes both the pre-built connectors provided by Instaclustr and the custom ones we uploaded. For this demonstration, we will select our custom GeneratorSourceConnector.
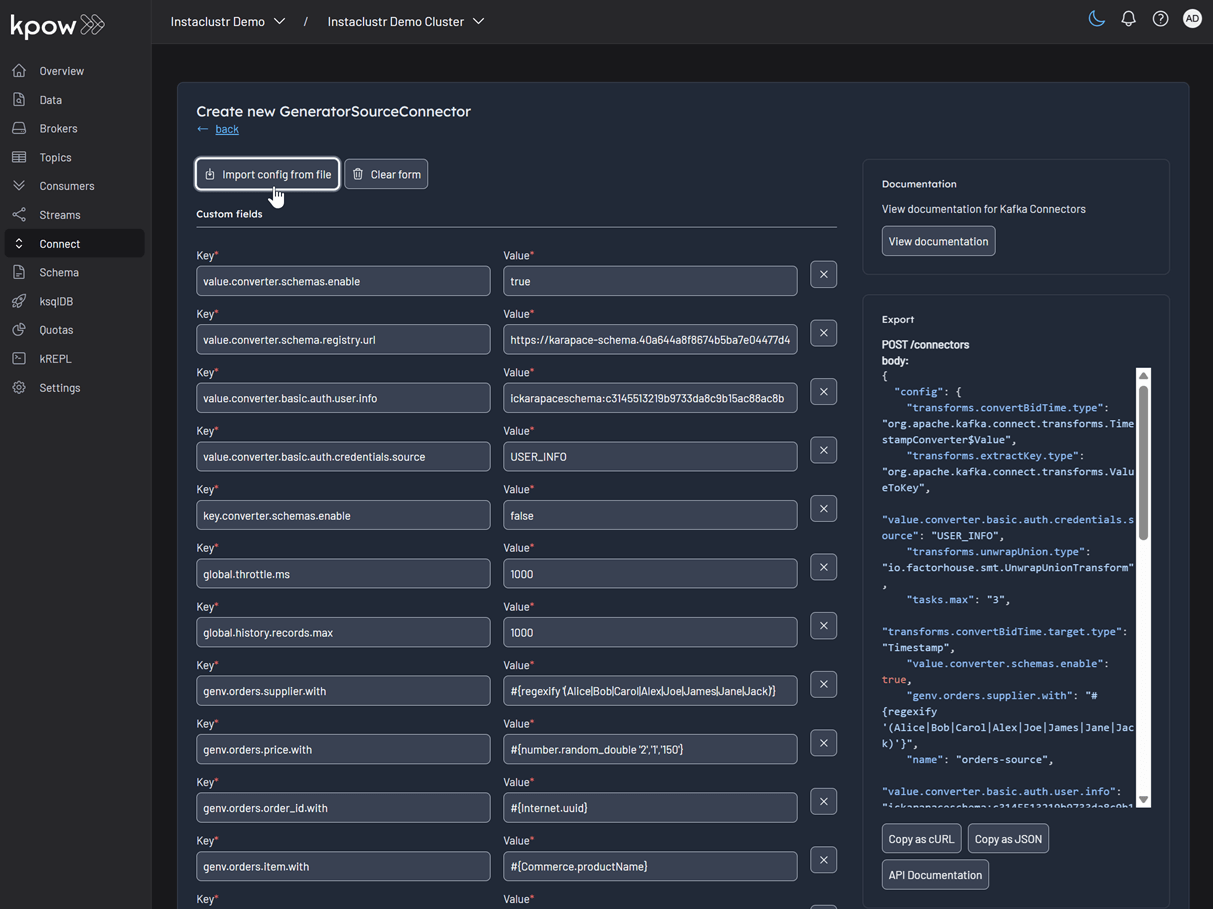
After selecting the connector, we can either input the configuration values manually or import a configuration file. We will import the JSON configuration file located at integrations/instaclustr-getting-started/connector/connector-source.json. We need to ensure that the schema registry URL and credentials in the file are updated with the correct values from our Instaclustr cluster.
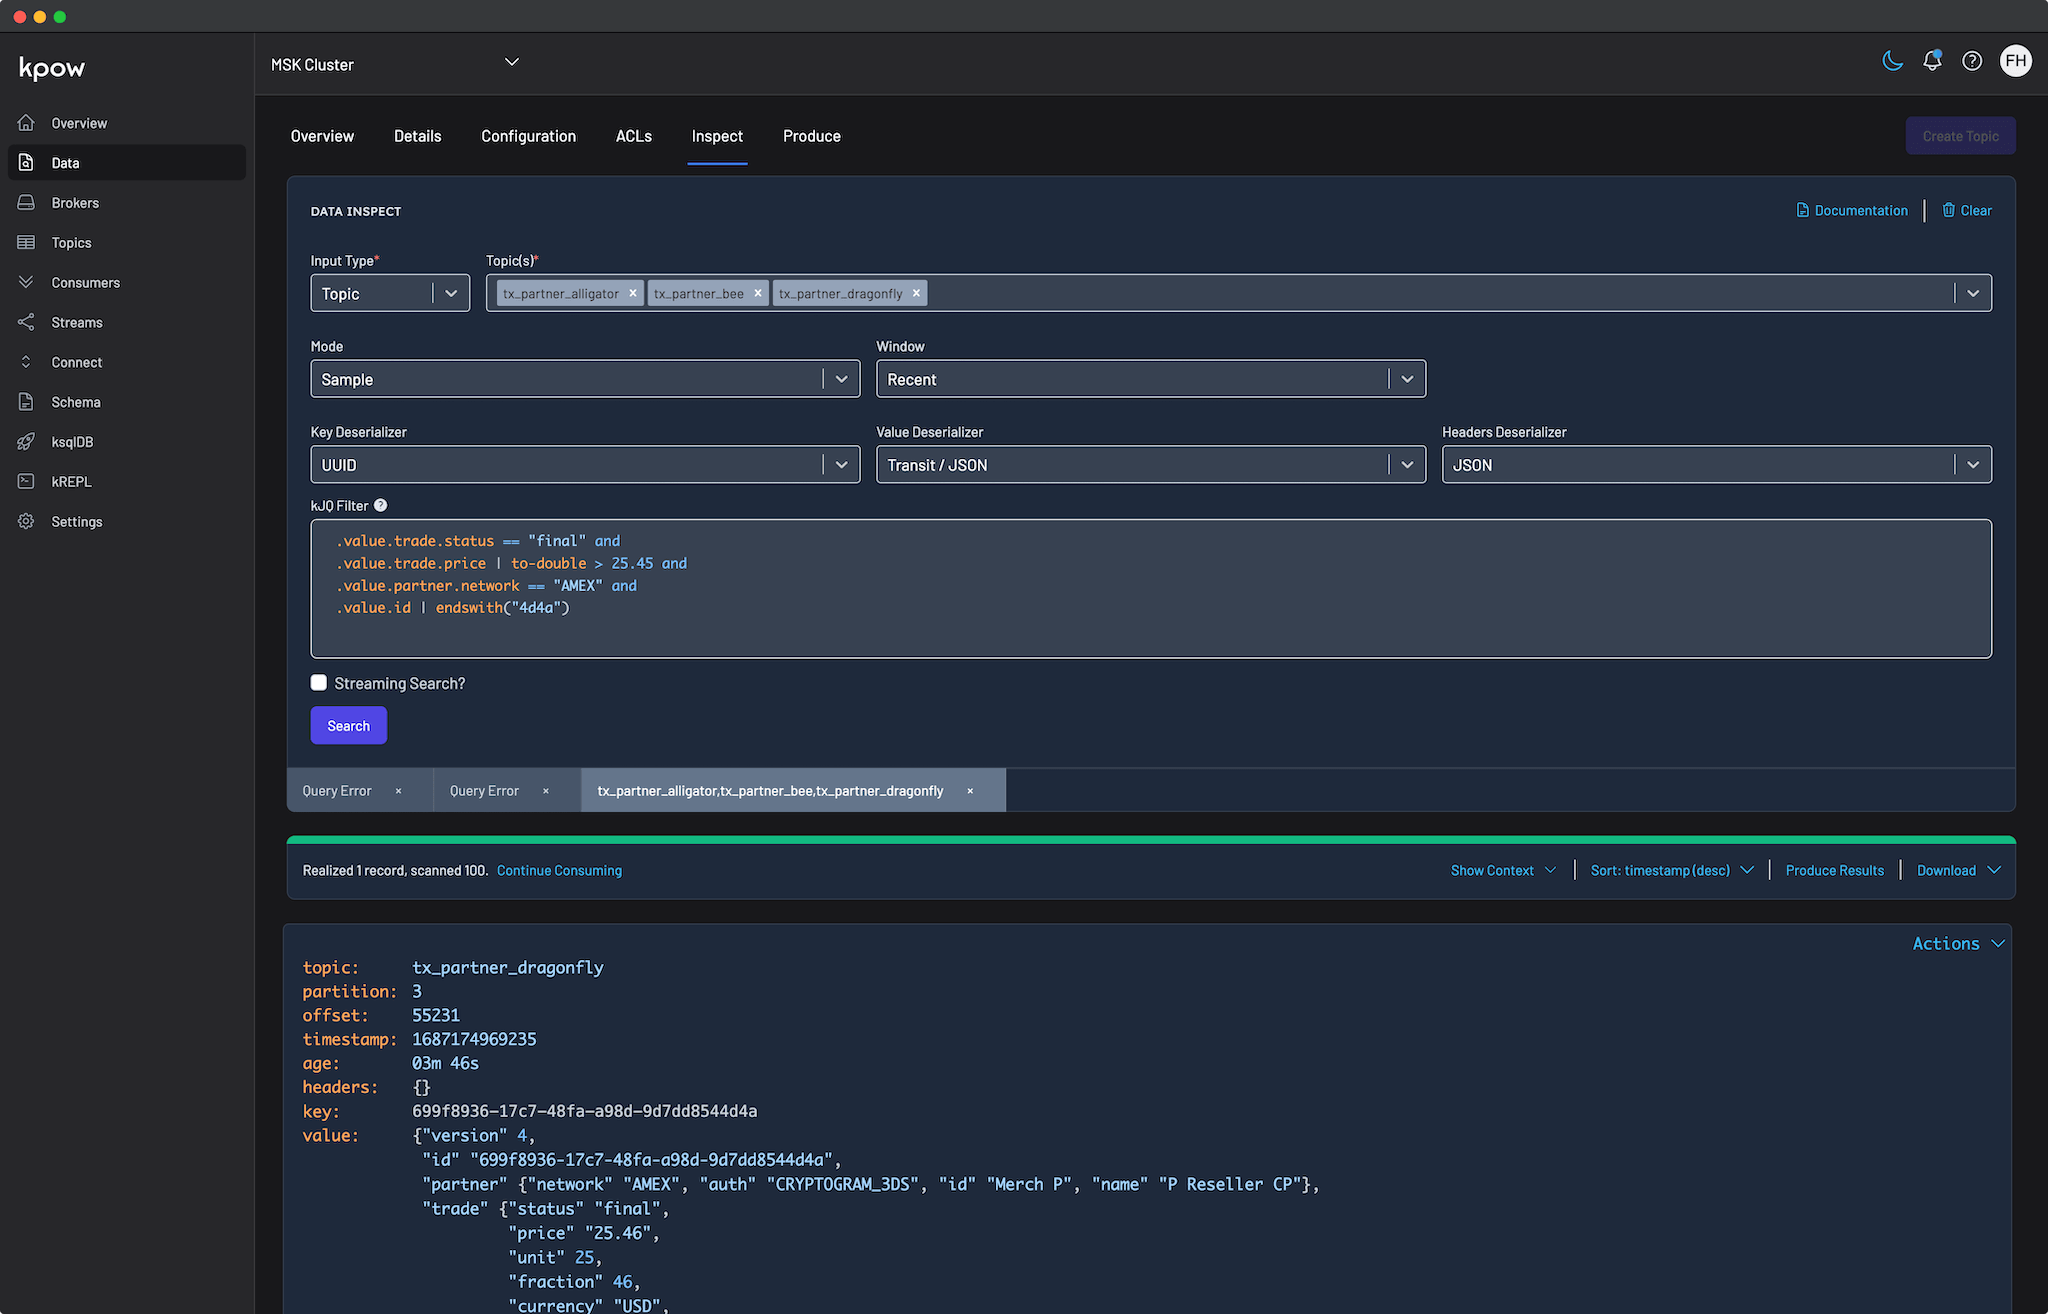
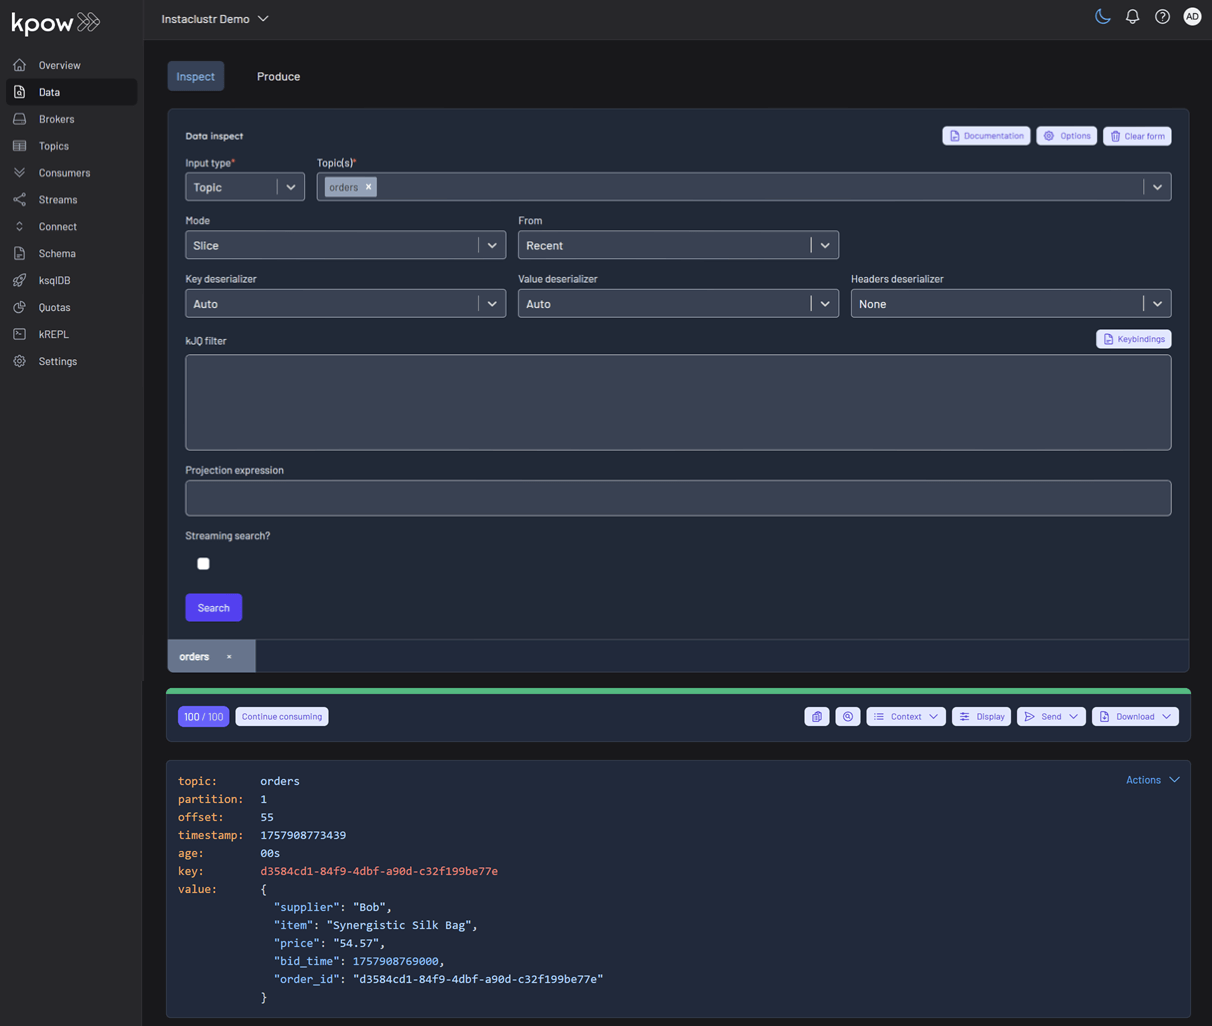
Inspect the topic and schema
Once the source connector is deployed, we can verify that the orders topic has been created by navigating to the Topics menu. To view the messages being produced, we can go to Data > Inspect, select the orders topic, and click Search.
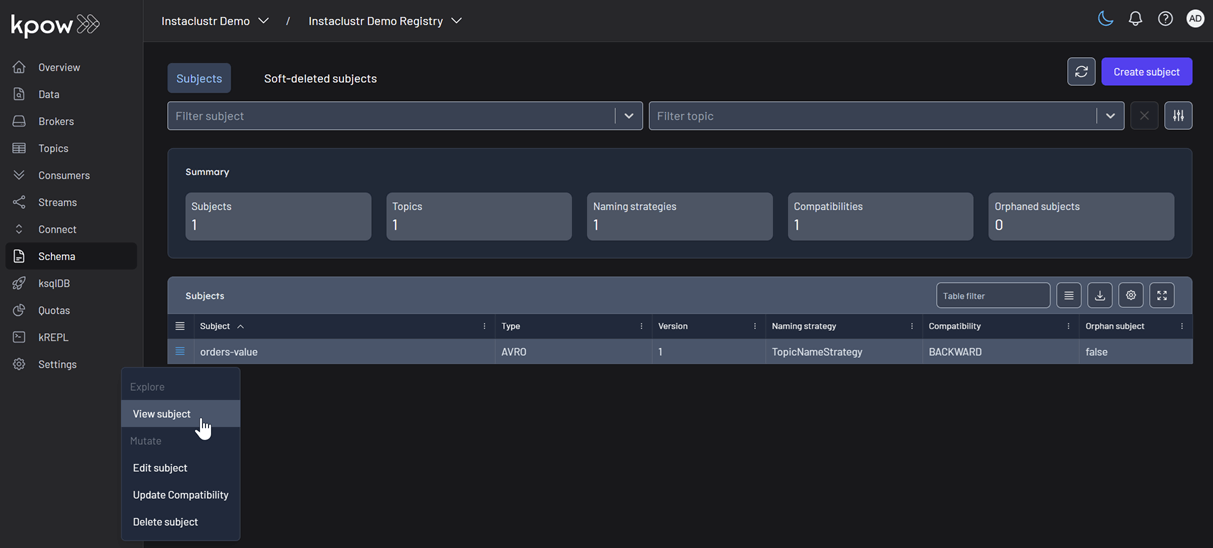
We can also inspect the Avro schema associated with our topic by navigating to the Schema menu.
Deploying the S3 sink connector
Similar to the source connector, we will now deploy the S3 sink connector to export the topic records to the S3 bucket we created earlier. We'll use the configuration file found at integrations/instaclustr-getting-started/connector/connector-sink.json. As before, we must ensure the schema registry connection details are correct, and we also need to provide the S3 bucket name and AWS credentials.
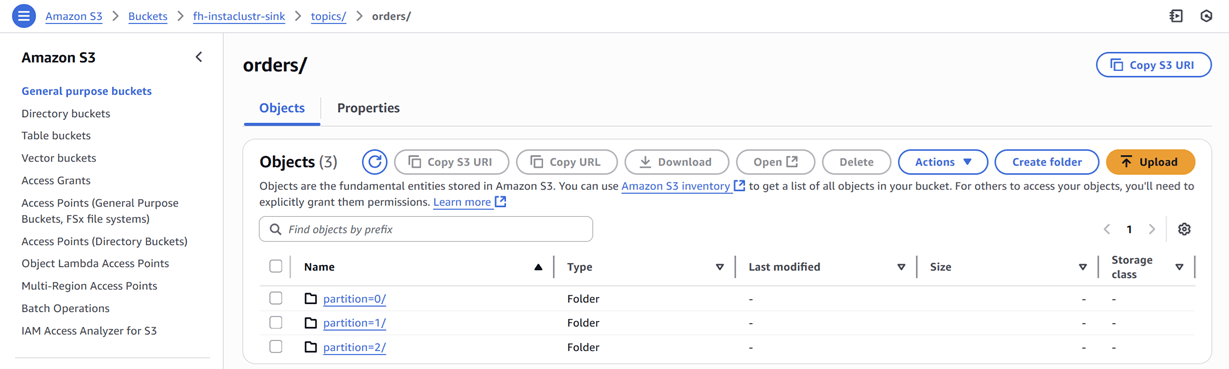
After the sink connector is deployed, we can verify that the topic records are being ingested as JSON files into our designated S3 bucket.
Conclusion
In this guide, we have successfully set up and integrated Kpow with a managed Apache Kafka environment on Instaclustr. We have seen how the connection details provided by the Instaclustr console can be seamlessly translated into a Kpow configuration, bringing our entire streaming ecosystem under a single, powerful user interface.
By walking through the practical example of deploying a data pipeline, we have demonstrated that this combination is more than just a monitoring solution. We used Kpow for active management of tasks: deploying a source connector, inspecting the live data flowing into our topics, viewing the associated schema in the registry, and finally deploying a sink connector to complete the pipeline. This highlights the core benefit of this integration: Instaclustr handles the difficult work of managing the infrastructure, while Kpow provides the intuitive, feature-rich toolkit needed for day-to-day development and operational tasks. With Kpow connected to your Instaclustr environment, you are empowered to manage your data pipelines with greater visibility, confidence, and efficiency.