Gain visibility, control, and security for Flink at scale. Flex puts you in command of Flink, delivering instant visibility, governed control, and enterprise-grade security. Run streaming jobs with confidence, precision, and speed.
Run your Flink at peak performance, confidently, securely, and at scale. See what’s happening in real time, act instantly, and keep your operations fully compliant.
Real-time visibility into jobs, checkpoints, metrics, configs, and state.
Act with confidence
Manage the full operational lifecycle of Flink jobs, including job submission, checkpointing, and savepointing.
Stay secure
Enterprise-grade governance with RBAC, SSO, Multi-Tenancy and data masking.
Why Flex is the Enterprise Standard for Apache Flink Control
Inspect everything, instantly
Understand your Flink jobs at a glance. From job graphs to checkpoint history, Flex gives your team the complete picture with enterprise-grade access control, including SSO and RBAC.
Manage the full job lifecycle
Securely manage the full Flink job lifecycle from the UI. Submit new pipelines, trigger savepoints for seamless upgrades or state backups, and cancel jobs when needed.
Intuitive for teams, powerful for pros
Our clean UI is backed by a REST API and integrates seamlessly with Prometheus and Webhooks for advanced monitoring and alerting.
Single view for your entire fleet
Manage your entire Flink fleet from a single control plane. Flex provides a unified view of all your application clusters, whether you have several co-located in one environment or dozens spread across hybrid and cloud infrastructures.
Built for the enterprise
Natively built for the enterprise with multi-tenancy, SSO, granular RBAC, audit logs, and full support for air-gapped deployments
What Makes Flex Unique
Immediate value
Go from installation to full visibility in minutes. A streamlined, lightweight setup means you connect to clusters and manage jobs immediately, skipping complex configuration.
Best-in-class UI
Designed with the same engineer-first ethos as Kpow, our UI translates complex Flink operations into clear, visual workflows, empowering your team to act with confidence.
Vendor-agnostic
Maintain a single, consistent control plane across your entire Flink ecosystem. Flex works seamlessly with a growing number of Flink distributions, including open-source Apache Flink and Ververica Platform, giving you true platform freedom.
Enterprise-trusted
Proven in mission-critical environments for enterprise-grade reliability. For Kpow users, the familiar UI provides a seamless, unified experience across your entire data-in-motion stack.
Lower TCO
Gain elite capabilities without the enterprise bloat or price tag. Flex lowers your Total Cost of Ownership by empowering your team with a lightweight, focused, and efficient tool.
Immediate value
Install, connect, and start managing jobs in minutes.
Best-in-class UI
Built with the same engineer-first ethos as Kpow
Vendor-agnostic
Works seamlessly across OSS Flink and a growing number of managed Flink distributions.
Enterprise-trusted
Trusted in mission-critical deployments, Flex’s familiar UI makes it a natural extension for Kpow users.
Lower TCO
Elite capability without the enterprise bloat (or price tag).
How Teams Use Flex
Flex accelerates stream processing operations across your org:
Job Lifecycle Management
Manage the complete Flink job lifecycle with fine-grained control. Submit jobs from uploaded JARs, resume from savepoints for seamless upgrades or recovery, and safely stop or cancel them when needed.
Deep Job Debugging
Visually inspect real-time job graphs, analyze exceptions, and drill into operator backpressure and watermarks to quickly identify and fix bottlenecks.
Live Task Analysis
Inspect individual task managers, view live logs, analyze thread dumps, and monitor memory to troubleshoot stuck or underperforming tasks.
Platform Observability
Get a unified, real-time view of your cluster's health, including memory and CPU usage, available task slots, and data throughput across all jobs.
Stream & State QA
Manage and monitor checkpoints and savepoints. Validate pipeline behaviour by inspecting task-level metrics, logs, and watermarks.
Governance & Security
Apply fine-grained access rules, redact sensitive data, and maintain audit trails for every action taken in the cluster.
What Customers Say
Engineering leaders trust Factor House to deliver reliable, scalable, and developer‑friendly solutions.
“I am grateful for the empathy and passion the Factor House team has shown in partnering with Airwallex to better understand our pain points to help drive the evolution of this brilliant product.”
Unlock the full potential of your dedicated OCI Streaming with Apache Kafka cluster. This guide shows you how to integrate Kpow with your OCI brokers and self-hosted Kafka Connect and Schema Registry, unifying them into a single, developer-ready toolkit for complete visibility and control over your entire Kafka ecosystem.
When working with real-time data on Oracle Cloud Infrastructure (OCI), you have two powerful, Kafka-compatible streaming services to choose from:
OCI Streaming with Apache Kafka: A dedicated, managed service that gives you full control over your own Apache Kafka cluster.
OCI Streaming: A serverless, Kafka-compatible platform designed for effortless, scalable data ingestion.
Choosing the dedicated OCI Streaming with Apache Kafka service gives you maximum control and the complete functionality of open-source Kafka. However, this control comes with a trade-off: unlike some other managed platforms, OCI does not provide managed Kafka Connect or Schema Registry services, recommending users provision them on custom instances.
This guide will walk you through integrating Kpow with your OCI Kafka cluster, alongside self-hosted instances of Kafka Connect and Schema Registry. The result is a complete, developer-ready environment that provides full visibility and control over your entire Kafka ecosystem.
❗ Note on the serverless OCI Streaming service: While you can connect Kpow to OCI's serverless offering, its functionality is limited because some Kafka APIs are yet to be implemented. Our OCI provider documentation explains how to connect, and you can review the specific API gaps in the official Oracle documentation.
Before creating a Kafka cluster, you must set up the necessary network infrastructure within your OCI tenancy. The Kafka cluster itself is deployed directly into this network, and this setup is also what ensures that your client applications (like Kpow) can securely connect to the brokers.
A Virtual Cloud Network (VCN): The foundational network for your cloud resources.
A Subnet: A subdivision of your VCN where you will launch the Kafka cluster and client VM.
Security Rules: Ingress rules configured in a Security List or Network Security Group to allow traffic on the required ports. For this guide, which uses SASL/SCRAM, you must open port 9092. If you were using mTLS, you would open port 9093.
Create a Vault Secret
OCI Kafka leverages the OCI Vault service to securely manage the credentials used for SASL/SCRAM authentication.
First, create a Vault in your desired compartment. Inside that Vault, create a new Secret with the following JSON content, replacing the placeholder values with your desired username and a strong password.
To allow OCI to manage your Kafka cluster and its associated network resources, you must create several IAM policies. These policies grant permissions to both user groups (for administrative actions) and the Kafka service principal (for operational tasks).
With the prerequisites in place, you can now create your Kafka cluster from the OCI console.
Navigate to Developer Services > Application Integration > OCI Streaming with Apache Kafka.
Click Create cluster and follow the wizard:
Cluster settings: Provide a name, select your compartment, and choose a Kafka version (e.g., 3.7).
Broker settings: Choose the number of brokers, the OCPU count per broker, and the block volume storage per broker.
Cluster configuration: OCI creates a default configuration for the cluster. You can review and edit its properties here. For this guide, add auto.create.topics.enable=true to the default configuration. Note that after creation, the cluster's configuration can only be changed using the OCI CLI or SDK.
Security settings: This section is for configuring Mutual TLS (mTLS). Since this guide uses SASL/SCRAM, leave this section blank. We will configure security after the cluster is created.
Networking: Choose the VCN and subnet you configured in the prerequisites.
Review your settings and click Create. OCI will begin provisioning your dedicated Kafka cluster.
Once the cluster's status becomes Active, select it from the cluster list page to view its details.
From the details page, select the Actions menu and then select Update SASL SCRAM.
In the Update SASL SCRAM panel, select the Vault and the Secret that contain your secure credentials.
Select Update.
After the update is complete, return to the Cluster Information section and copy the Bootstrap Servers endpoint for SASL-SCRAM. You will need this for the next steps.
Launch a Client VM
We need a virtual machine to host Kpow, Kafka Connect, and Schema Registry. This VM must have network access to the Kafka cluster.
In the "Add SSH keys" section, choose the option to "Generate a key pair for me" and click the "Save Private Key" button. This is your only chance to download this key, which is required for SSH access.
Configure Networking: During the instance creation, configure the networking as follows:
Placement: Assign the instance to the same VCN as your Kafka cluster, in a subnet that can reach your Kafka brokers.
Kpow UI Access: Ensure the subnet's security rules allow inbound TCP traffic on port 3000. This opens the port for the Kpow web interface.
Internet Access: The instance needs outbound access to pull the Kpow Docker image.
Simple Setup: For development, place the instance in a public subnet with an Internet Gateway.
Secure (Production): We recommend using a private subnet with a NAT Gateway. This allows outbound connections without exposing the instance to inbound internet traffic.
Connect and Install Docker: Once the VM is in the "Running" state, use the private key you saved to SSH into its public or private IP address and install Docker.
Deploying Kpow with Supporting Instances
On your client VM, we will use Docker Compose to launch Kpow, Kafka Connect, and Schema Registry.
First, create a setup script to prepare the environment. This script downloads the MSK Data Generator (a useful source connector for creating sample data) and sets up the JAAS configuration files required for Schema Registry's basic authentication.
Next, create a `docker-compose.yml` file. This defines our three services. Be sure to replace the placeholder values (<BOOTSTRAP_SERVER_ADDRESS>, <VAULT_USERNAME>, <VAULT_PASSWORD>) with your specific OCI Kafka details.
Finally, create a license.env file with your Kpow license details. Then, run the setup script and launch the services:
chmod +x setup.sh
bash setup.sh && docker-compose up -d
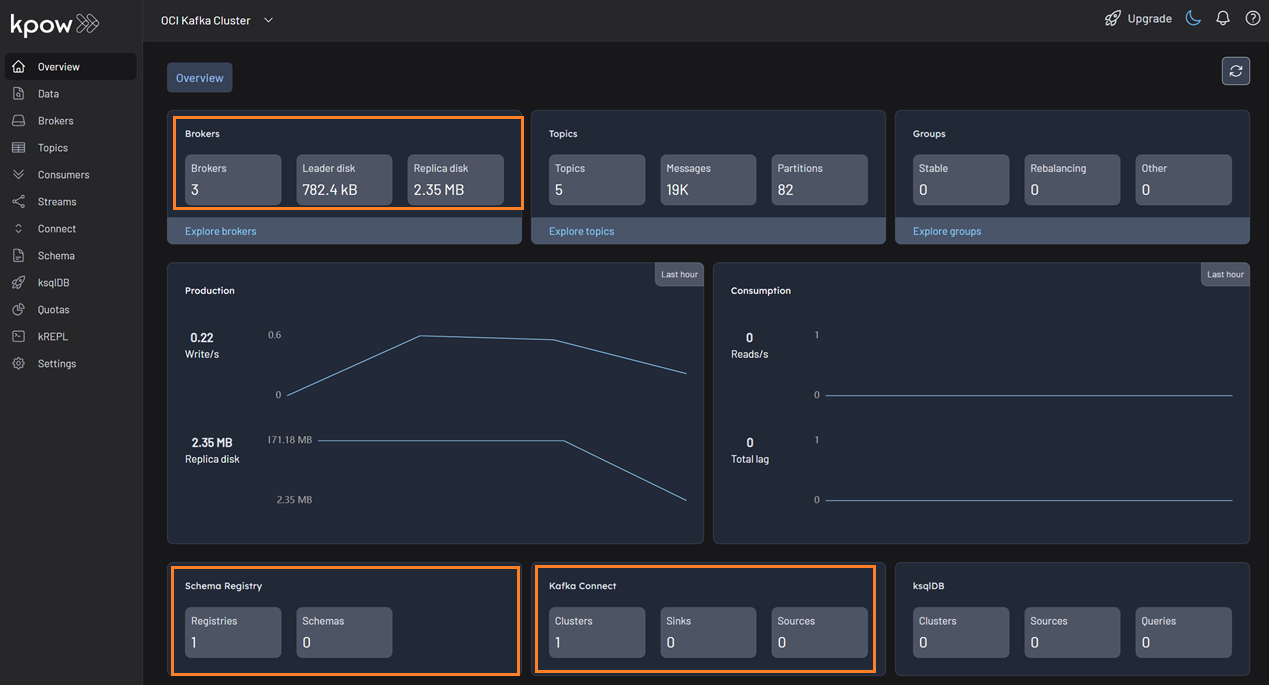
Kpow will now be accessible at http://<vm-ip-address>:3000. You will see an overview of your OCI Kafka cluster, including your self-hosted Kafka Connect and Schema Registry instances.
Deploy Kafka Connector
Now let's deploy a connector to generate some data.
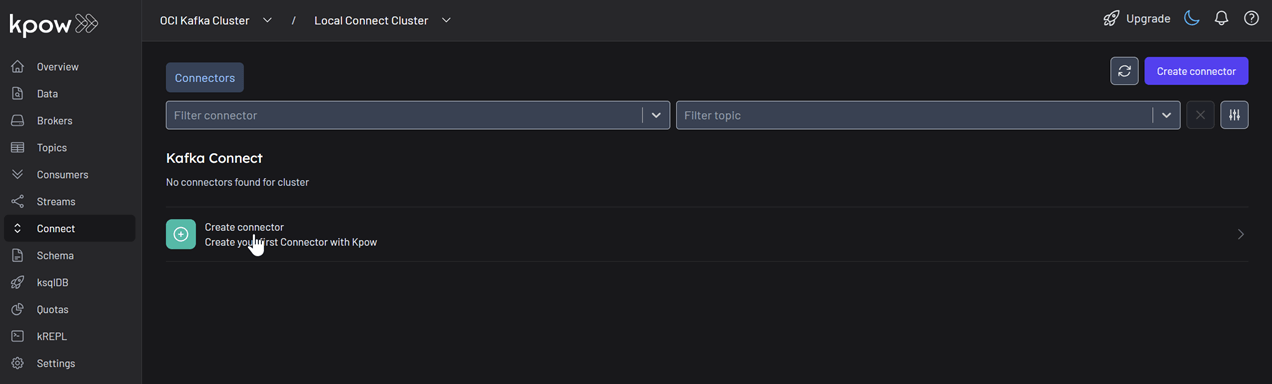
In the Connect menu of the Kpow UI, click the Create connector button.
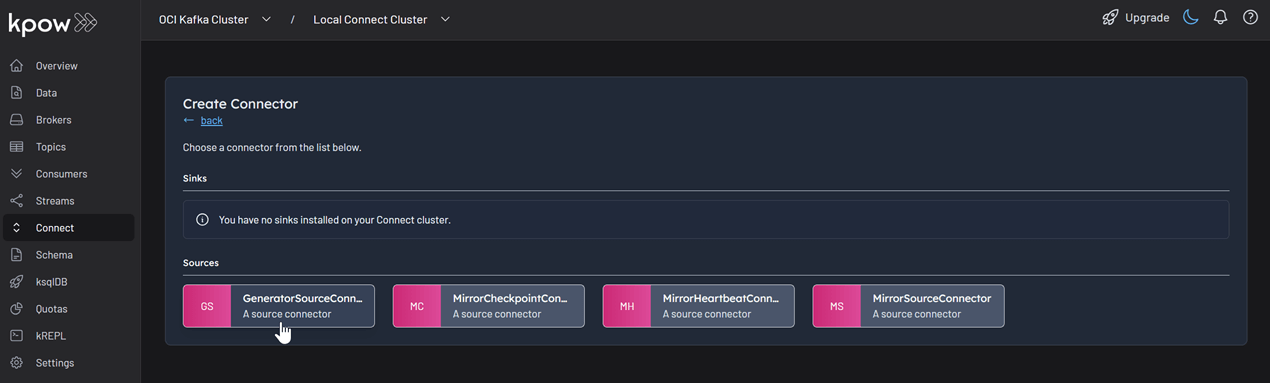
Among the available connectors, select GenerateSourceConnector, which is the source connector that generates fake order records.
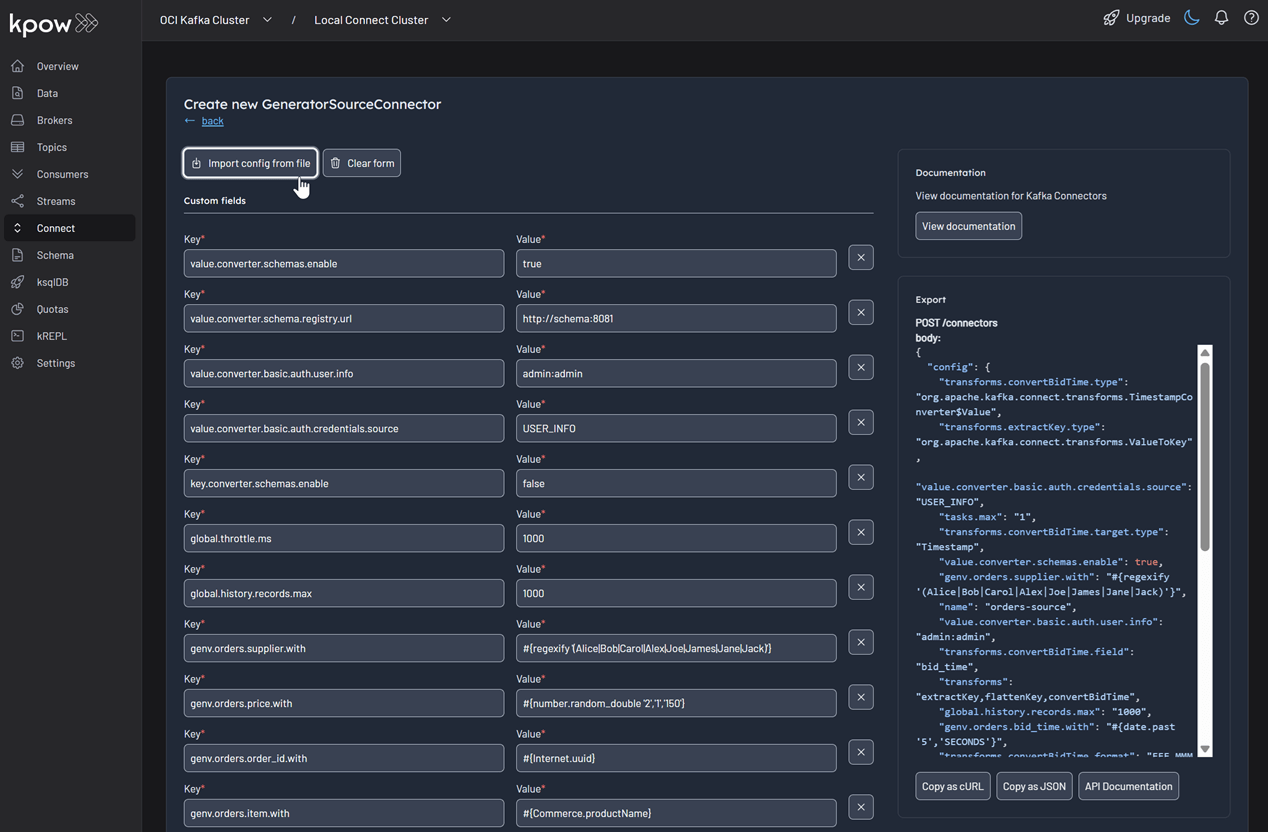
Save the following configuration to a Json file, then import it and click Create. This configuration tells the connector to generate order data, use Avro for the value, and apply several Single Message Transforms (SMTs) to shape the final message.
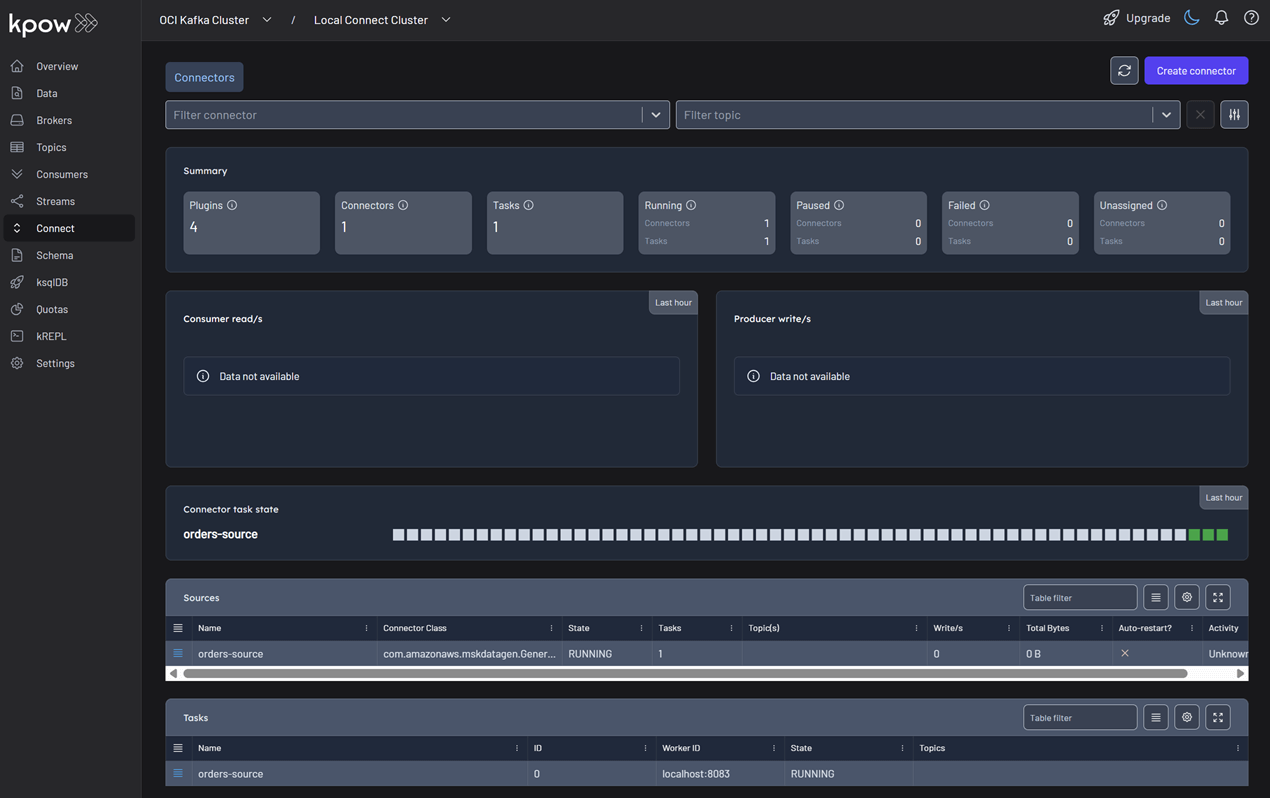
Once deployed, you can see the running connector and its task in the Kpow UI.
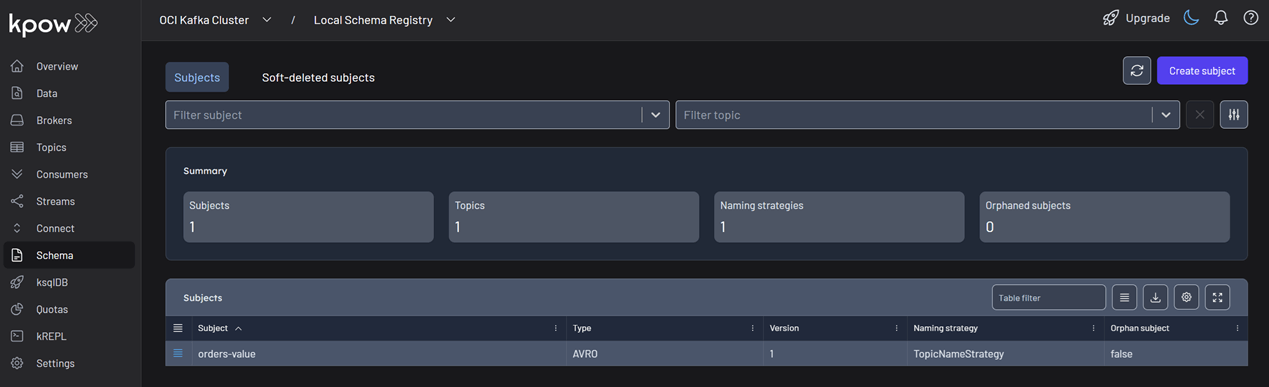
In the Schema menu, you can verify that a new value schema (orders-value) has been registered for the orders topic.
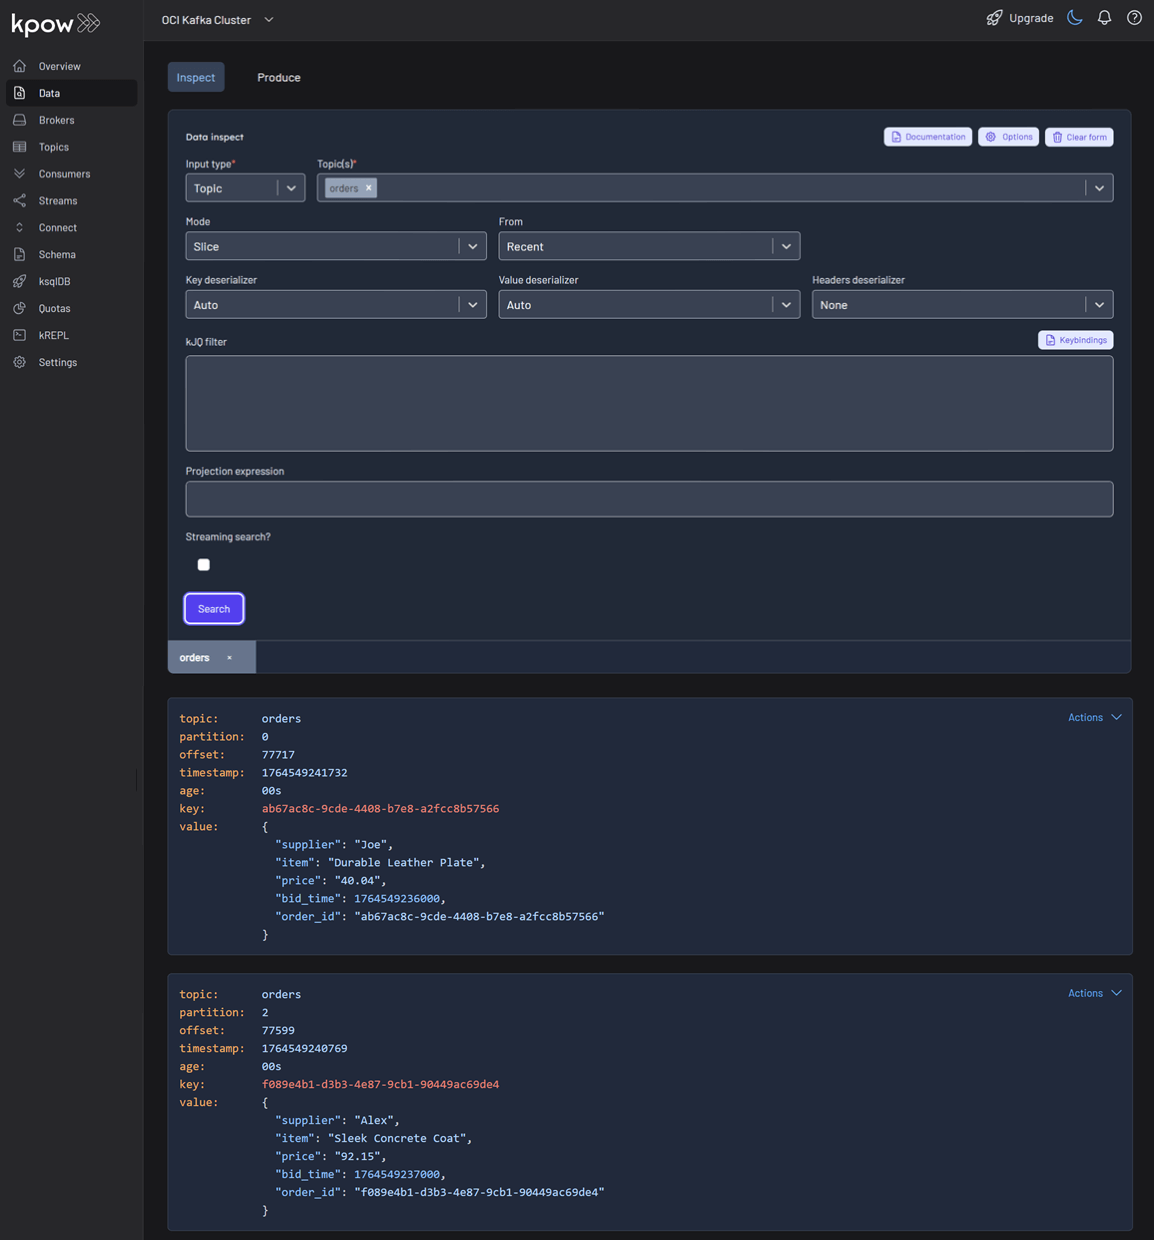
Finally, navigate to Data > Inspect, select the orders topic, and click Search to see the streaming data produced by your new connector.
Conclusion
You have now successfully integrated Kpow with OCI Streaming with Apache Kafka, providing a complete, self-hosted streaming stack on Oracle's powerful cloud infrastructure. By deploying Kafka Connect and Schema Registry alongside your cluster, you have a fully-featured, production-ready environment.
With Kpow, you have gained end-to-end visibility and control, from monitoring broker health and consumer lag to managing schemas, connectors, and inspecting live data streams. This empowers your team to develop, debug, and operate your Kafka-based applications with confidence.
Flex is the management platform for enterprise Flink operations. It enhances Apache Flink with a sophisticated UI and a full REST API, providing the security, governance, and deep observability required to manage streaming jobs with confidence.
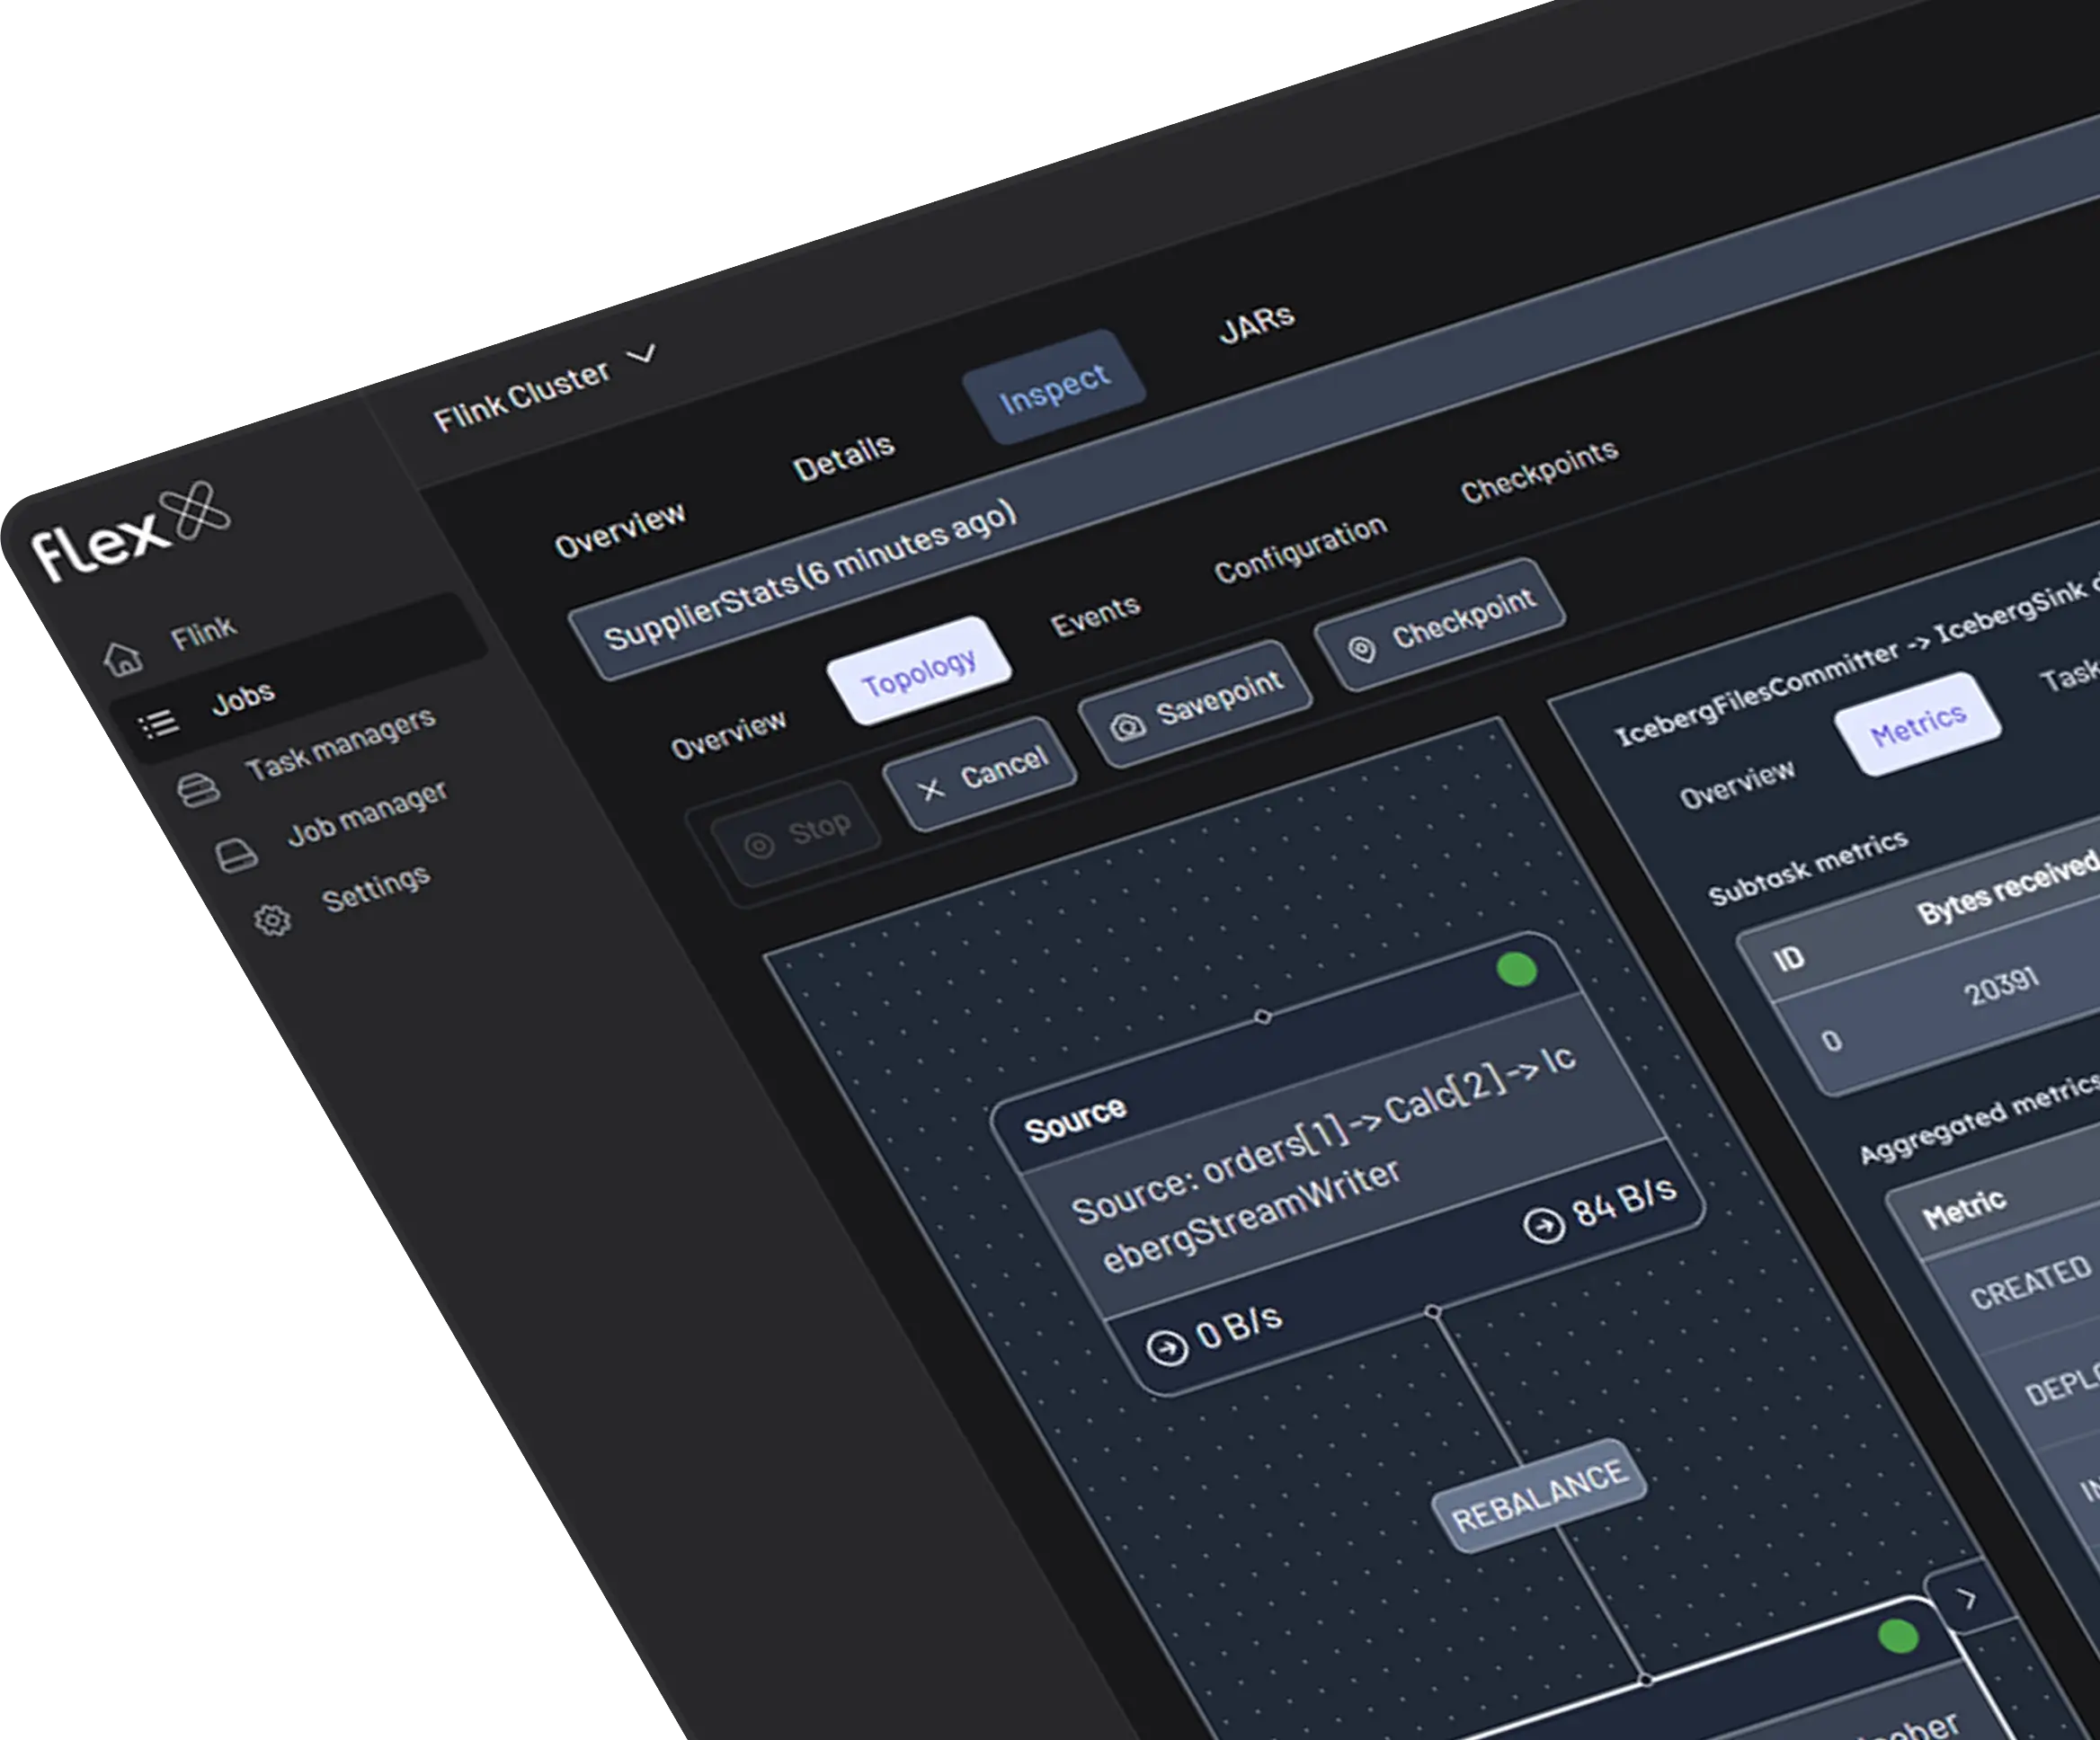
Comprehensive Job Visibility
Visually inspect job graphs, sub-tasks, operators, and checkpoint history to instantly understand the health and structure of your Flink jobs.
Real-Time Performance Monitoring
Diagnose bottlenecks by visualizing critical Flink metrics, including backpressure, records-per-second, watermarks, and task-level exceptions.
Governed Operational Control
Securely manage the full lifecycle of jobs. Every action is protected by Role-Based Access Controls (RBAC) and recorded in a detailed audit log for full compliance.
Centralized Cluster Management
Monitor and manage jobs across multiple Flink clusters from a single, unified interface designed for large-scale and high-availability operations.
Enterprise-Grade Security
Enforce secure access with your choice of SSO providers (SAML, OIDC) and manage permissions with a robust Role-Based Access Control (RBAC) system.
Powerful REST API
Automate Flink management and integrate with CI/CD pipelines using a comprehensive REST API for complete programmatic control.
Flex Feature Matrix
Community
Perfect for local development or ephemeral environments.
Kpow empowers engineering teams at Fortune 500 companies, fintech innovators, and global platforms, managing hundreds of Kafka clusters. With proven performance at scale and minimal onboarding friction, it’s no wonder teams prefer Kpow over legacy vendor tools.
“I am grateful for the empathy and passion the Factor House team has shown in partnering with Airwallex to better understand our pain points to help drive the evolution of this brilliant product.”
Unlock the full potential of your dedicated OCI Streaming with Apache Kafka cluster. This guide shows you how to integrate Kpow with your OCI brokers and self-hosted Kafka Connect and Schema Registry, unifying them into a single, developer-ready toolkit for complete visibility and control over your entire Kafka ecosystem.
When working with real-time data on Oracle Cloud Infrastructure (OCI), you have two powerful, Kafka-compatible streaming services to choose from:
OCI Streaming with Apache Kafka: A dedicated, managed service that gives you full control over your own Apache Kafka cluster.
OCI Streaming: A serverless, Kafka-compatible platform designed for effortless, scalable data ingestion.
Choosing the dedicated OCI Streaming with Apache Kafka service gives you maximum control and the complete functionality of open-source Kafka. However, this control comes with a trade-off: unlike some other managed platforms, OCI does not provide managed Kafka Connect or Schema Registry services, recommending users provision them on custom instances.
This guide will walk you through integrating Kpow with your OCI Kafka cluster, alongside self-hosted instances of Kafka Connect and Schema Registry. The result is a complete, developer-ready environment that provides full visibility and control over your entire Kafka ecosystem.
❗ Note on the serverless OCI Streaming service: While you can connect Kpow to OCI's serverless offering, its functionality is limited because some Kafka APIs are yet to be implemented. Our OCI provider documentation explains how to connect, and you can review the specific API gaps in the official Oracle documentation.
Before creating a Kafka cluster, you must set up the necessary network infrastructure within your OCI tenancy. The Kafka cluster itself is deployed directly into this network, and this setup is also what ensures that your client applications (like Kpow) can securely connect to the brokers.
A Virtual Cloud Network (VCN): The foundational network for your cloud resources.
A Subnet: A subdivision of your VCN where you will launch the Kafka cluster and client VM.
Security Rules: Ingress rules configured in a Security List or Network Security Group to allow traffic on the required ports. For this guide, which uses SASL/SCRAM, you must open port 9092. If you were using mTLS, you would open port 9093.
Create a Vault Secret
OCI Kafka leverages the OCI Vault service to securely manage the credentials used for SASL/SCRAM authentication.
First, create a Vault in your desired compartment. Inside that Vault, create a new Secret with the following JSON content, replacing the placeholder values with your desired username and a strong password.
To allow OCI to manage your Kafka cluster and its associated network resources, you must create several IAM policies. These policies grant permissions to both user groups (for administrative actions) and the Kafka service principal (for operational tasks).
With the prerequisites in place, you can now create your Kafka cluster from the OCI console.
Navigate to Developer Services > Application Integration > OCI Streaming with Apache Kafka.
Click Create cluster and follow the wizard:
Cluster settings: Provide a name, select your compartment, and choose a Kafka version (e.g., 3.7).
Broker settings: Choose the number of brokers, the OCPU count per broker, and the block volume storage per broker.
Cluster configuration: OCI creates a default configuration for the cluster. You can review and edit its properties here. For this guide, add auto.create.topics.enable=true to the default configuration. Note that after creation, the cluster's configuration can only be changed using the OCI CLI or SDK.
Security settings: This section is for configuring Mutual TLS (mTLS). Since this guide uses SASL/SCRAM, leave this section blank. We will configure security after the cluster is created.
Networking: Choose the VCN and subnet you configured in the prerequisites.
Review your settings and click Create. OCI will begin provisioning your dedicated Kafka cluster.
Once the cluster's status becomes Active, select it from the cluster list page to view its details.
From the details page, select the Actions menu and then select Update SASL SCRAM.
In the Update SASL SCRAM panel, select the Vault and the Secret that contain your secure credentials.
Select Update.
After the update is complete, return to the Cluster Information section and copy the Bootstrap Servers endpoint for SASL-SCRAM. You will need this for the next steps.
Launch a Client VM
We need a virtual machine to host Kpow, Kafka Connect, and Schema Registry. This VM must have network access to the Kafka cluster.
In the "Add SSH keys" section, choose the option to "Generate a key pair for me" and click the "Save Private Key" button. This is your only chance to download this key, which is required for SSH access.
Configure Networking: During the instance creation, configure the networking as follows:
Placement: Assign the instance to the same VCN as your Kafka cluster, in a subnet that can reach your Kafka brokers.
Kpow UI Access: Ensure the subnet's security rules allow inbound TCP traffic on port 3000. This opens the port for the Kpow web interface.
Internet Access: The instance needs outbound access to pull the Kpow Docker image.
Simple Setup: For development, place the instance in a public subnet with an Internet Gateway.
Secure (Production): We recommend using a private subnet with a NAT Gateway. This allows outbound connections without exposing the instance to inbound internet traffic.
Connect and Install Docker: Once the VM is in the "Running" state, use the private key you saved to SSH into its public or private IP address and install Docker.
Deploying Kpow with Supporting Instances
On your client VM, we will use Docker Compose to launch Kpow, Kafka Connect, and Schema Registry.
First, create a setup script to prepare the environment. This script downloads the MSK Data Generator (a useful source connector for creating sample data) and sets up the JAAS configuration files required for Schema Registry's basic authentication.
Next, create a `docker-compose.yml` file. This defines our three services. Be sure to replace the placeholder values (<BOOTSTRAP_SERVER_ADDRESS>, <VAULT_USERNAME>, <VAULT_PASSWORD>) with your specific OCI Kafka details.
Finally, create a license.env file with your Kpow license details. Then, run the setup script and launch the services:
chmod +x setup.sh
bash setup.sh && docker-compose up -d
Kpow will now be accessible at http://<vm-ip-address>:3000. You will see an overview of your OCI Kafka cluster, including your self-hosted Kafka Connect and Schema Registry instances.
Deploy Kafka Connector
Now let's deploy a connector to generate some data.
In the Connect menu of the Kpow UI, click the Create connector button.
Among the available connectors, select GenerateSourceConnector, which is the source connector that generates fake order records.
Save the following configuration to a Json file, then import it and click Create. This configuration tells the connector to generate order data, use Avro for the value, and apply several Single Message Transforms (SMTs) to shape the final message.
Once deployed, you can see the running connector and its task in the Kpow UI.
In the Schema menu, you can verify that a new value schema (orders-value) has been registered for the orders topic.
Finally, navigate to Data > Inspect, select the orders topic, and click Search to see the streaming data produced by your new connector.
Conclusion
You have now successfully integrated Kpow with OCI Streaming with Apache Kafka, providing a complete, self-hosted streaming stack on Oracle's powerful cloud infrastructure. By deploying Kafka Connect and Schema Registry alongside your cluster, you have a fully-featured, production-ready environment.
With Kpow, you have gained end-to-end visibility and control, from monitoring broker health and consumer lag to managing schemas, connectors, and inspecting live data streams. This empowers your team to develop, debug, and operate your Kafka-based applications with confidence.
Teams, SMBs and large enterprises with advanced compliance & governance needs
Clusters
Unlimited
Features
- SSO and RBAC
- REST API
- Prometheus and Webhook (Slack, Teams) Integration
- Administrative Workflows and Audit Logs
Explore FLEX Free
Start with a 30-day Trial
Sign-up for a trial to evaluate our fully-featured, enterprise-ready Apache Flink UI free for 30-days in your business environment, or join the Factor House community to accelerate your individual Flink and Kafka development process.
Flex for Apache Flink will soon be available via the AWS Marketplace. With options to pay by the hour, monthly, or annually.
faqs
Frequently Ask Questions
Whether you’re an individual developer or a global enterprise, Flex scales to meet your needs. Flex integrates with Ververica Platform and Open Source Solutions.
Simplify Flink management with intuitive tools, real-time monitoring, and advanced analytics.
The free 30-day trial provides access to the full suite of enterprise-grade features, including RBAC, governance and audit logging.


.png)
.png)
.png)

.png)

.png)

.png)


.png)
.png)
.png)


.png)

.png)

.png)


.png)
.png)
.png)
.png)
.png)

.png)

.png)
.png)
.png)

.png)

.png)

.png)
%20(1).png)
%20(1).png)

.png)


.png)


.png)